Homemade Griddled Onion & Brie Burger

The perfect gourmet griddled onion and brie burger doesn’t exist? Hold my beer.
Every element in this burger recipe builds upon the previous one’s flavor. High-fat beef patties create a strong enough base to anchor the burger’s flavor. Then, a toasted brioche bun and griddled onions give a hint of sweetness and buttery char. The cracked pepper and lime aioli adds a zing of tart lime and richness. And the brie and arugula give the burger an interesting earthiness, with the arugula echoing back the zip of pepper in the aioli.
This is a copycat recipe from my favorite burger restaurant. The owners retired, so I’ve resorted to recreating their amazing recipes at home. Because it’s what I do, and I cannot live without this burger. There’s a sister burger to this one I am also working on, so if you’re excited now, just wait!
I’ve written this recipe so that you can make every element of this burger from scratch. But don’t get too overwhelmed by the ingredient lists. I’ve also provided storebought substitutions, to make things easier, if you want to get right to the good stuff.
Sure do! Here is a countdown for my Homemade Griddled Onion and brie Burger, from start to finish, that is chronologically from starting the buns the day before to assembly time!
26 hours… start brioche
25 hours… proof brioche and make aioli
4 hours… trim and freeze beef
3 hours… shape and proof brioche buns
2 hours… grind meat and shape patties
1.5 hours… bake buns
1.25 hours… slice onions and sauté onions
30min… salt and pepper patties
15 min… slice brie and cook burgers
10 min…toast buns
My preferred doneness is between medium and medium well.
Not everyone likes their burgers cooked medium. And that’s okay! If you happen to fall into that boat, here’s a chart with different levels of doneness and their corresponding internal temps, before and after carryover cooking.
Surprisingly, carry over cooking with burgers is about the same as with steaks, so if you are already well versed with cooking steak or roasts (like Dry-Brined, Reverse-Seared Prime Rib), you are good to go! 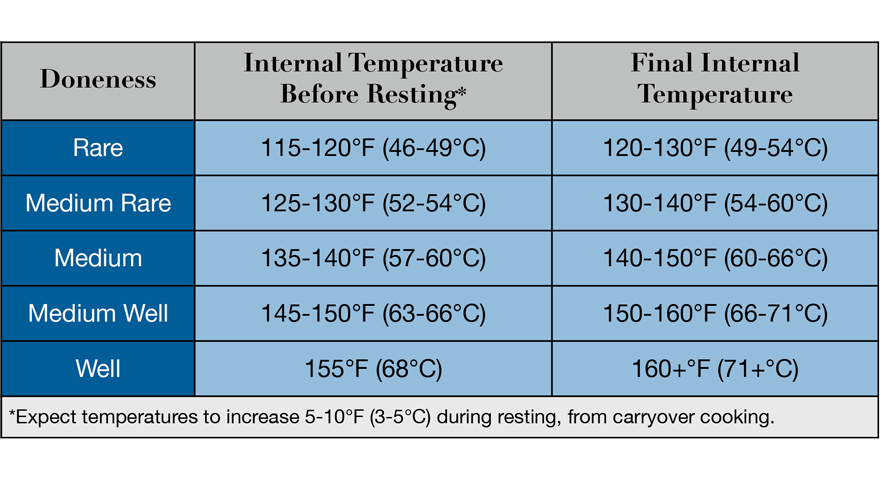
The only difference is the rest time. Resting should be about 5 minutes. It’s plenty of time for the juices to reabsorb and the fat to cool a bit. The protein fibers in burgers are less dense than in steaks, so rest time is also less.
You have 2 options:
1. Chop by Hand: It takes a bit of time, but, with a sturdy knife and perseverance, this method gives you a lot of control over the size of your final “grind”. It also keeps the fat intact better than the second option.
For hand-chopping, I suggest working in batches of .5lbs (227g) or less at a time so the meat doesn’t get too chaotic. (It’s kind of like chopping chocolate in that respect) I still recommend having the meat partially frozen. It makes it soooo much easier to cut without compressing the meat and fat together.
2. Chop in a Food Processor: Reputable chef J. Kenji Lopez-Alt (James Beard Award winning author of The Food Lab and Wok) suggests you can grind meat in a food processor. And if it’s good enough for him then it’s good enough for me.
Work with the chilled meat, by first cutting it into 1/2in-1in (1.3-2.5cm) pieces. Once cubed, let the meat come to a defrosted but still very cold temperature, if it is not already there. Work in batches of .5lbs (227g) or less and pulse the food processor until you have a grind size similar to store bought ground beef. According to Kenji (Writing just his first name like this is weird. OMG!), It will likely, not be uniform in size. Extra option: If you want to follow up with a little knife work, you can fix that issue.
There is a subtle textural difference between the two. Pan cooking a burger means that the whole surface touches direct heat. The crust is across the entire top and bottom of the burger. When cooking on a grill, only the grill marks get seared. The rest is cooked by ambient heat. Is this a big deal? Not at all.
The biggest difference between the two styles of cooking is actually in the flavor. A burger cooked on the stovetop or Blackstone tastes exactly like cooked beef and nothing else. Burgers cooked on a grill are going to taste smokey.
I personally prefer this burger from a cooktop and not a stove. But there are enough strong flavors that they won’t get overwhelmed even with the added flavor from your grill. Choose what you like best!
My recommended method is to freeze and vacuum seal the burgers for up to 4 months.
To do this, place the burgers (so they aren’t touching) on a silicone baking sheet lined baking tray. Cover the tray with cling film and put it in the freezer until the burgers have frozen all of the way through. Then, cut and seal one end of several bags to fit your preferred number of burgers per meal. Slide the burgers into the bag(s) and vacuum seal. Label the bag and place it in the freezer for safe keeping.
Of Note: You can also individually freeze the burgers on a tray and then store the patties in a resealable bag in your freezer. These will keep well 1-2 months.
A windowpane test helps you see how well the gluten structure in your dough has developed.
For a windowpane test, get your hands slightly wet and pull some of the dough up from the bowl. Stretch it out until it’s thin enough to see light through the dough. If the brioche dough stretches smoothly and gets thin enough without breaking, it’s ready.
Of course! Here’s a recipe for the burger sauce when the base is pre-made mayo.
Mix 1/2 cup (120ml or 120g) plain mayo with 1/2tsp (1.2g) cracked pepper, zest from 1 lime (1g), 1/2tbsp (7.5ml) fresh lime juice, 4 cloves roasted garlic, (12.5g) (or 2 fresh, 6g) (optional additions of sumac or black lime powder are also nice.) Do not use Kewpie mayo. It’s too rich.
Of Note: Making mayonnaise is super easy. And when you can use base ingredients, it also makes it much easier to tailor it to your tastes or to better balance a recipe. The ratio of eggs: oil: acid (lime juice): salt: and mustard powder is the base of the mayo. All the additions can be substituted and/or changed up! Feel free to experiment with vinegar, lemon juice, other spices, etc. to your heart’s content.
Sweet onions, like Vidalia, really are the way to go, but I suppose you could also use yellow onions or shallots if you don’t have any sweet onions.


Post Comment